

Sofiya Boroday
Undergraduate, 2021
Create your first OCHRE Web App in 4 easy steps
This article walks the adventurous user step-by-step through the process of building a web application that is powered by OCHRE data. While you will be exposed to HTML, CSS, and Javascript code, no prior knowledge is required.
1. Getting started
Before delving into the technical details of HTML and API calls, it’s vital to properly set up the working environment. This step may be the single most time-consuming (and often most frustrating), but once completed will ensure that your files are both editable and easily accessible on the internet. There will be two main elements of your working environment: your local code editor, which allows easy manipulation and debugging of code, and the GitHub repository, which both hosts the templates you’ll be tailoring to your project’s needs and serves as the place from which your site will be pushed to the web.
Setting up GitHub
GitHub is, in simple terms, a platform for hosting and sharing code. Individual users interact with the platform by creating repositories, essentially folders containing all the code and other materials needed for a specific project. For this project, you won’t need to set up the repository yourself; simply contact Dr. Miller Prosser at the OCHRE Data Service, who will set one up for you. You will, however, need to create a free GitHub account on github.com to access the repository. Email Dr. Prosser with your GitHub account name so that he can send an invitation to your account. Log in to your GitHub account to accept the repository invitation from the OCHRE Data Service.
Setting up git
GitHub, which you’ll be using more intensively in the following section, relies on the underlying Git architecture. Git is the actual infrastructure that creates and manages the repositories you’ll be working with, while GitHub is a user interface that allows easier interactions with this infrastructure. In order to use GitHub, then, you need to have Git installed. Most Linux and Mac computers come with Git pre-installed (if you’re using one of these operating systems and would like to check if you have Git, this page on GitHub’s website has instructions). However, if you have a Windows computer, you’ll need to download and install Git separately, which you can do here.
Setting up VS Code
While there are many editors available for download, and you’re free to choose which one you’d like to use, this tutorial will walk through the installation and basic configuration process for Visual Studio Code (VS Code).
I. Download
VS Code can be downloaded like any other application. It is available for Mac, Windows, and Linux operating systems at this link. After downloading, you can customize the platform with a variety of themes, settings, and custom keybindings (shortcuts for commands you may use frequently).
II. Install useful extensions (and connect GitHub to VS Code)
One advantage of VS Code is the ability to install a wide range of plug-ins to handle different needs, whether programming language integration, debugging, or adding new themes. These extensions are found in the VS Code Marketplace, accessible through the Extensions icon on the left-hand menu bar. To install an extension, search for its name or a keyword in the Marketplace search bar, select one of the results, and click on the small blue Install button in the header. Some extensions may require additional log-ins or setup, depending on their function. No extensions are required to run code, but they do make the process of coding, debugging, and previewing your website easier, and several are necessary to make VS Code compatible with outside programs, like GitHub. These extensions in particular may prove useful as you create your website:
II.1. GitHub Pull Requests and Issues
The GitHub Pull Requests and Issues extension allows you to connect VS Code to GitHub in order to access files in your repository, make changes, and upload the new files back to your repository. Once installed, you will see a notification pop up on the Accounts icon in the menu bar. Click on the icon and select the last menu option: “Sign in to use GitHub Pull Requests and Issues.” This will redirect you to your browser, where you will be prompted to sign in to the GitHub account you set up earlier in order to authorize VS Code to access GitHub. You will then be redirected back to VS Code; to make sure the connection worked, click on the Accounts icon again, where you should see your GitHub account in the expanded menu.
II.2. Live Server
While not strictly required, this extension is very useful for previewing what your website will look like after making any changes to the code, without going through the process of uploading the code to GitHub and waiting for the web version of your site to be updated. Live Server works by creating a local host on your computer, essentially doing the same thing a web server would do when rendering your code on someone’s computer when they access your website. However, the local host is only visible to you, on your machine, and is automatically reloaded whenever you save changes to your code.
II.3. HTML CSS Support
Similarly, while default VS Code provides support of various kinds for a range of programming languages, it may be useful to download language-specific extensions providing more specific tools for the languages you intend to use. The HTML CSS Support extension makes autocompletion of certain properties easier, and allows for more seamless integration of CSS files in your HTML code.
II.4. Bootstrap v4 and v5 snippets
Bootstrap is a popular HTML, CSS, and JavaScript framework used in many of the template files you’ll be receiving. It encodes a variety of CSS shortcuts to minimize the number of elements you’ll have to code from the ground up, and is particularly useful for easily creating websites that work on mobile devices as well as larger-screened computers. To maximize the utility of Bootstrap, download the Bootstrap v4 and v5 snippets extension (this is a single extension; that is, not “Bootstrap v4 snippets” with another for v5), which will autosuggest Bootstrap class names as you work. This is particularly useful because several element names have changed from v4 to v5, and since this extension supports both versions, it will suggest only the elements appropriate for the version of Bootstrap you have loaded, saving you the effort of constantly checking what specific element you need to enter in order to get a navbar, for instance.
III. Setting up your directory structure
The final step of the setup process is indicating to VS Code what file structure you’ll be working in. VS Code is set up to use what it calls workspaces, which are essentially folders containing all of the files you’re using for your project, as well as any subfolders that may be necessary. Since the OCHRE Data Service has set up a GitHub repository for your project, this guide will cover setting up that repository as your workspace. You can also create a workspace containing local files, or one with distinct folders for keeping track of multiple projects at once (see the VS Code workspace documentation for additional information), but since your project will involve collaboration with the OCHRE Data Service team, it’s most convenient to clone your GitHub repository and avoid using extra local files unless absolutely necessary.
III.1 Clone your GitHub repository
In the context of VS Code, cloning simply refers to downloading a copy of the files in a repository for use on your local computer. The advantage of cloning the repository to VS Code, rather than downloading the files separately and opening the local versions, is that VS Code, paired with the GitHub Pull Requests and Issues extension, allows you to push the changes you’ve made to the files in your repository to GitHub directly from the VS Code window. If you’re working in a cloned copy of your repository, VS Code automatically suggests pushing the changes you’ve made to GitHub, so that you don’t have to manually transfer the changed files to a different folder or application in order to get your changes to show up on the web version of your site.
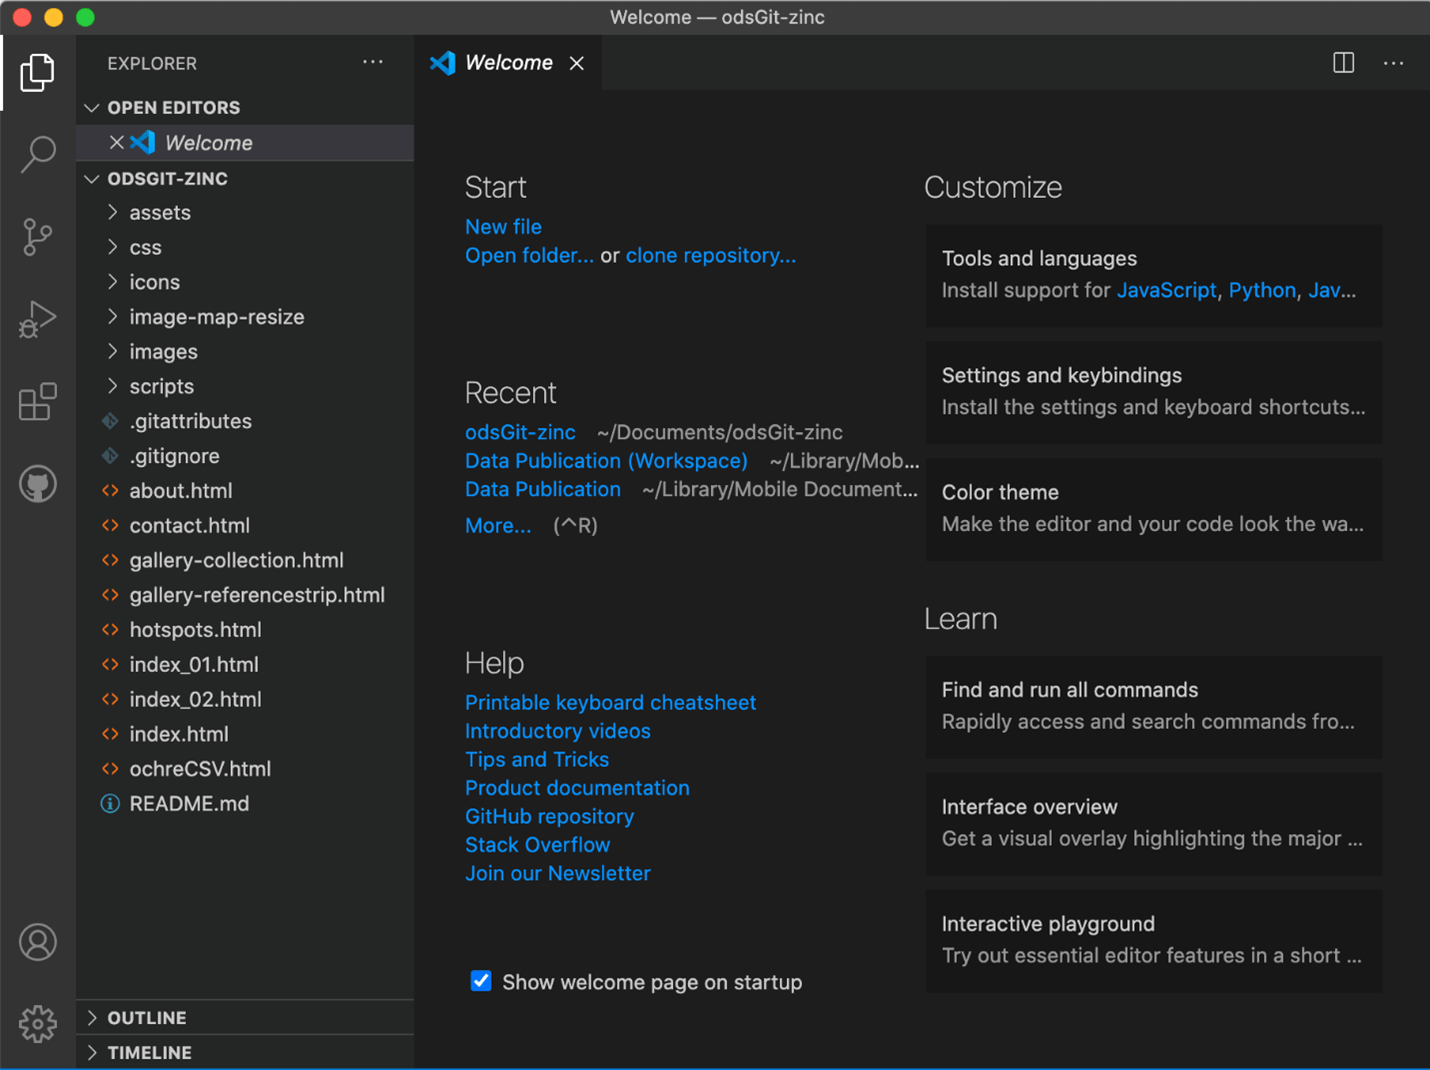
When you open VS Code before opening any files, you will see a welcome screen like the one below (your window may look slightly different if you’ve chosen a different theme or configured your panes differently, but the basic functionality will be the same). If necessary, use the Explorer button (top-left) to return to this screen.

VS Code Welcome Screen
Both the left pane and the main welcome screen (under “Start”) offer links to clone a repository. Select either of the links, and an input bar will pop up at the top of the screen prompting you to provide the URL or pick a repository source. I find the URL option more straightforward; all you have to do is navigate to the GitHub webpage for your repository and copy the URL from the page’s search bar into VS Code.
Hit enter (or click on the “Clone from URL…” option that will pop up), and VS Code will launch a new window, where you can select the location on your computer where you’d like the files to reside. Once you hit “Select Repository Location,” VS Code will automatically copy the files from the GitHub repository to the folder you selected. As you can see below, I chose my local Documents folder as the repository location, and when I open the Finder app on my Mac, the files from the sample repository have all been copied.

GitHub repository directory structure, as shown on a Mac
Once the files are in your selected local folder, a new prompt will pop up in the bottom right corner of VS Code prompting you to either open the workspace in the existing window or open a new window with the selected workspace. When you make your selection, your repository files should populate in the side bar, something like the sample screenshot below.
GitHub repository, as shown in VS Code
Every file in the repository is now accessible in VS Code, including all code files as well as images and other multimedia content. Your workspace has now been set up; click on any of the files in the side bar to open it in the editor pane, and you can begin to code.
III.2 Before you begin
Before you begin working on a new file, though, it will be useful to look through the directory and read any readme files that may be in any of the folders. In my sample repository, there’s a README.md file in both the scripts folder (collapsed in the screenshot above) and in the main repository folder. These files, if they’re present, provide a range of information about the repository itself, what each file contains, how to use certain elements or functions, and anything else that may be useful to know about the repository. If you’re uncertain of where to start or what pages you should be editing, look through any readme files that may be in your repository.
Here is what the beginning of my sample readme file looks like (the full file is over 200 lines long). The document goes through each of the directories and files in the repository, explaining what they are or what they contain.

Read the README.md file!
2. Editing the HTML/CSS
Before getting into the specifics of editing HTML code, here is a quick summary of what HTML is and how it interacts with other programming languages. HTML (Hypertext Markup Language) is the language of most of the content published on the Internet as a website. It contains information about all the elements that should be present on your site, organized in a neat hierarchical structure, and it also links to other material, like CSS or JavaScript code files, that work on those elements. In very reductive terms, HTML tells your website’s elements what they are and where they should be on the page, CSS tells them how to look, and JavaScript tells (some of) them what to do. For this reason, we’ll start by going over the process of adding and changing HTML elements.
Working with the Live Server Extension
One final note before moving on to actual coding. As mentioned earlier, the Live Server extension opens your HTML code in a local host on your computer, allowing you to track how the changes you make to your code will affect the final website output. It simply opens a new tab on your default browser that looks like any other website, but the URL will start with a string of numbers rather than a domain name. When you save changes to the HTML document, the live version in your browser will automatically update to reflect the new changes. There are several ways to trigger the extension but I find these two the simplest:
I. Status Bar Button
Once the Live Server Extension is installed, a new Go Live button will appear on the bottom status bar of your window. Click on the button, and your site will launch in a browser window.

Live Server (Extension) Go Live
Once you’ve launched a server, your status bar will change, and a new popup will appear, giving you specifics about what port the server is going through. To close the server, click on the Port:[…] button, and it will revert to its original Go Live appearance.
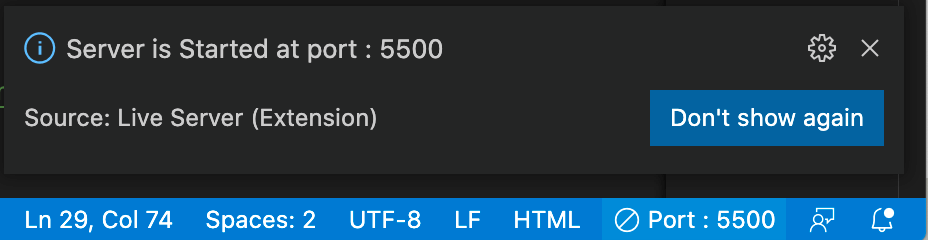
Live Server (Extension) Port details
II. Keystrokes
To launch the server on a Mac, hit command + l, command + o; to close a server that has been opened, hit command +l, command + c. On a PC, hit alt +l, alt + o to open and alt +l, alt + c to close.
Working with the OCHRE Data Service templates
Let’s start with a homepage template. In my repository, as the #ochre-templates section near the top of the readme file explains, there are two different homepage templates: one simple text-based template and another image-based, splash page template. Here’s what they look like when I open them as web pages using Live Server:
index_01.html:
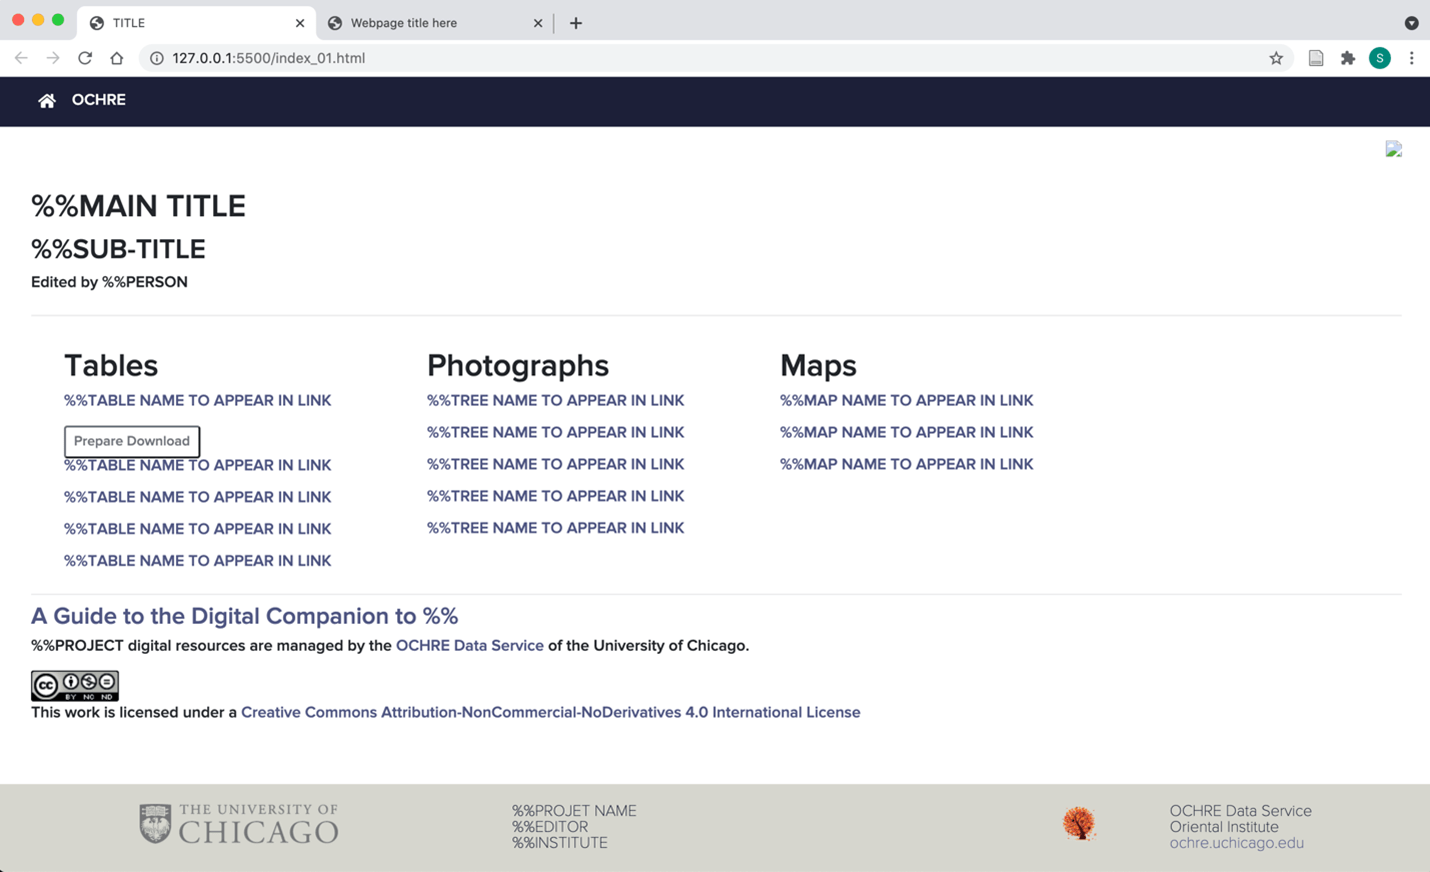
Basic text-based home page
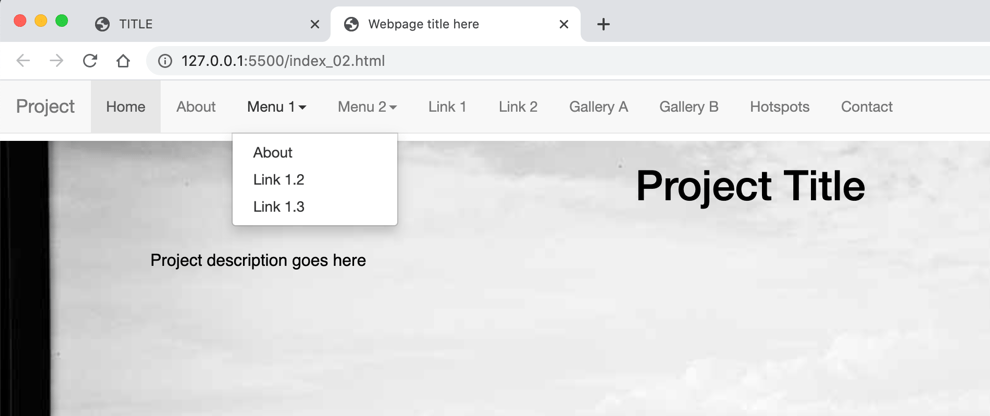
index_02.html:

Splash page with background image and advanced menu bar
As you can see, the splash page contains less information than the more basic home page. However, it also includes an interactive navigation bar linking to other pages that can contain the same information as that found in the basic home page. It’s up to you which approach you take; this guide will pull examples from both. Your final choice for the home page must be named ‘index.html’. So, if you choose index_01.html, just delete the existing index.html (a stub ‘Coming soon’ page) and rename your chosen home page to index.html.
HTML Basics
Here is the start of the HTML file (index_01.html) that results in the first, text-based home page:

The HTML file for the text-based home page
As you can see, this template HTML file has instructions written in as comments (in HTML, any text enclosed by <!– text –> is a comment; comments are human-readable but not rendered by a browser or local host). As these instructions indicate, all prewritten comments should be deleted when you’re done with edits. The only exceptions are licensing information and any comments that may be necessary to explain the function of a code block or to segment off sections of code.
Parts of the code
In the screenshot above, you can see that each element is enclosed by opening and closing tags. Each of these tags imparts certain properties onto the contents—for instance, the <title> tag indicates that the text it encompasses will be displayed on the tab of the page in the browser. Most elements will need both an opening tag (<title>) and a closing tag (</title>). In addition, in accordance with HTML’s hierarchical structure, all elements must be entirely contained within their parent elements and need to completely enclose their child elements. See for instance this section of code from later in the same file:
<div class=”col-xs-3 mx-5″><h2>Tables</h2><p><a href=”%%PI LINK TO OCHRE DATA” target=”_blank”>%%TABLE NAME TO APPEAR IN LINK</a></p><button id=”%%ADD UUID OF ALTERNATE DOWNLOAD SET HERE” class=”btn-outline-secondary btn-sm”onclick=”openCSVPage(this.id)”>Prepare Download</button><p><a href=”%%PI LINK TO OCHRE DATA” target=”_blank”>%%TABLE NAME TO APPEAR IN LINK</a></p><p><a href=”%%PI LINK TO OCHRE DATA” target=”_blank”>%%TABLE NAME TO APPEAR IN LINK</a></p><p><a href=”%%PI LINK TO OCHRE DATA” target=”_blank”>%%TABLE NAME TO APPEAR IN LINK</a></p><p><a href=”%%PI LINK TO OCHRE DATA” target=”_blank”>%%TABLE NAME TO APPEAR IN LINK</a></p></div>
In this code block, there are multiple <p> elements (roughly corresponding to paragraphs). Each <p> element contains an <a> element (a hyperlink). Each <a> element has both its opening and closing tags completely within its parent <p> element, and all the <p> elements are fully enclosed within their parent <div> element (whose opening tag is at the top of the code block and whose closing element is at the end). This is important to understand if you’ll be adding in more elements to the template provided—HTML will not allow you to overlap tags, and elements will not display properly if they’re not within the correct parent element.
Editing HTML text
As the comments at the beginning of the template indicate, all elements that you need to change will be marked with %%. For simple text changes, just search “%%” in the file and make any necessary modifications. For instance, in the screenshot below, I’ve changed the text in the <title> element in the header and several <p> elements in the body:
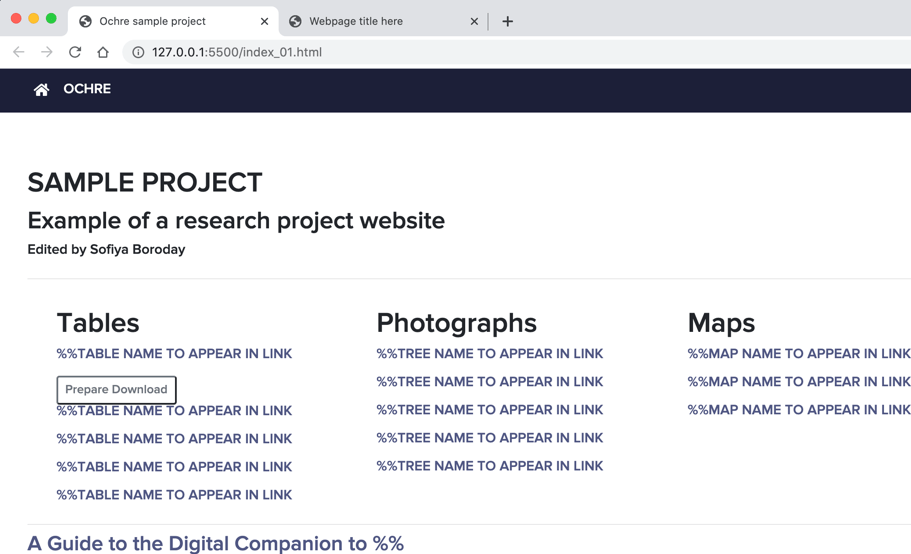
Sample project website home page
The modifications here are simple; just replace a section of the inner text with the appropriate value. This is the code block I modified … before …
<div class=”col”><p class=”h2 pt-5″>%%MAIN TITLE</p><p class=”h3″>%%SUB-TITLE</p><p>Edited by %%PERSON</p></div>
… and after …

Editing code block to specify project details
By comparison, the template for the image-based splash page has the following lines of code for the project title. The template you receive may follow either of these formats, but there will always be some comments providing you with detailed instructions on what to change and how to change it.
<div class=”container”><h1>Project Title</h1> <!– put desired title for the homepage here –></div>
Editing elements with linked content
<div class=”col d-none d-lg-block”><img src=”assets/%%tiwanaku.jpg” style=”float:right;”></div>

Adding an image icon
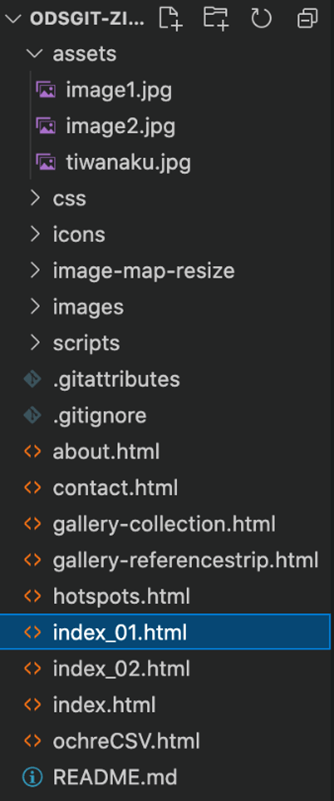
File structure of the project, including image assets
<!– replace “Link 1.1” with name of first link in dropdown menu, replace # with URL for that page –><li><a href=”#”>Link 1.1</a></li>
<!– replace “Link 1.1” with name of first link in dropdown menu, replace # with URL for that page –><li><a href=”about.html“>About</a></li>
Link to the ‘About’ page from the splash page menu
When clicked, the About link opens about.html, resulting in this display:

Template for ‘About’ page
In this final example of linking, the same line has been modified, but instead of linking to another file in the directory, it now links to the OCHRE Data Service website (https://voices.uchicago.edu/ochre/) .The screenshot was taken with my mouse hovering over the OCHRE Data Service link, and the link source is visible in the bottom left corner.
<!– replace “Link 1.1” with name of first link in dropdown menu, replace # with URL for that page –><li><a href=”https://voices.uchicago.edu/ochre/“>OCHRE Data Service</a></li>
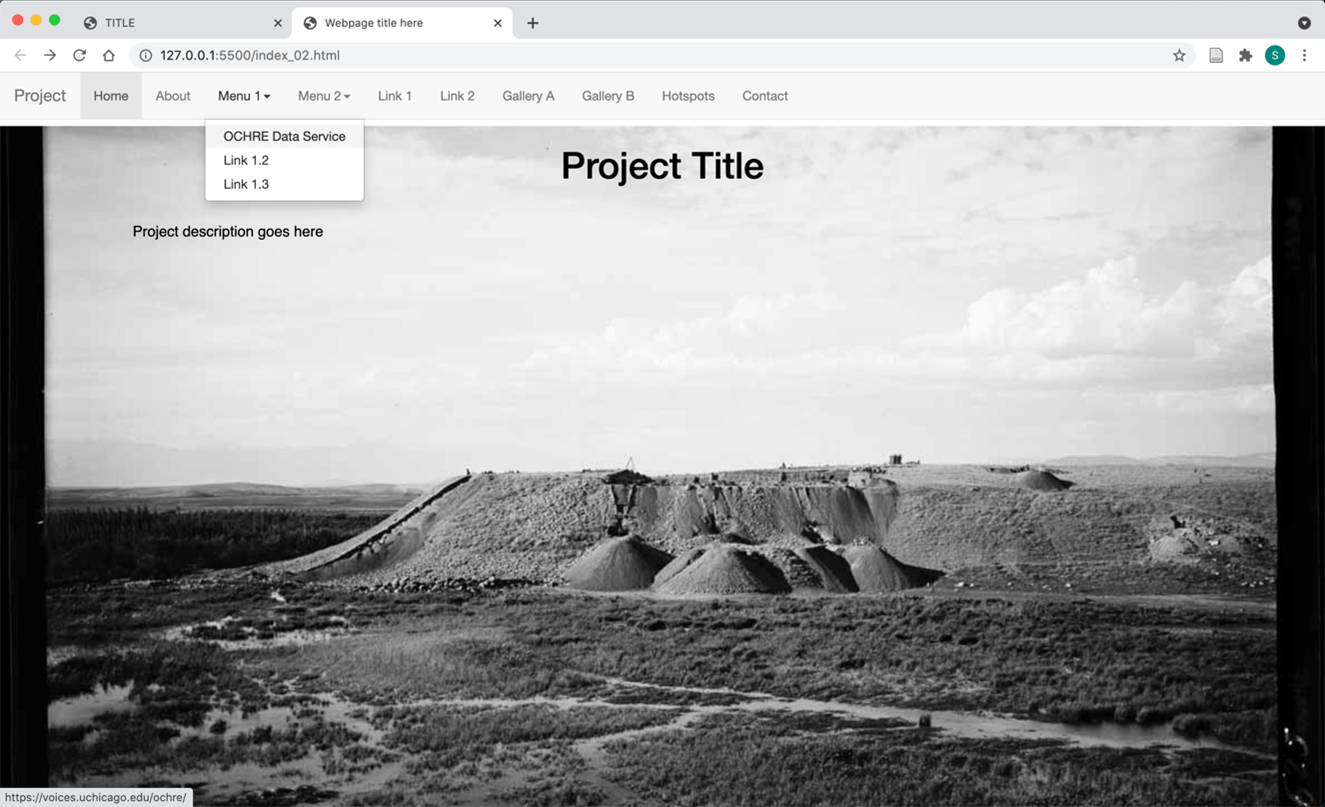
Link to the OCHRE Data Service website
Styling with CSS
If you chose to proceed with the image-based splash page index, perhaps you are wondering where the image file is located, since it is obviously not in the project assets folder. This is where CSS comes into play.
Find the homepage.css file in the css folder in the project directory. On the @media style you will find the “background-image” setting. Enter a filename or URL that identifies the image to be used. Go Live to see the result!
@media (min-width: 768px) {.bg {margin-top: 4%;background-image: url(“http://pi.lib.uchicago.edu/1001/org/ochre/cb1d5585-3165-41c2-98f5-2b85310d6f77&image”);background-position: center;background-repeat: no-repeat;background-size: cover;}}
background-image: url(“../assets/image2.jpg”);
3. Using the OCHRE API
APIs are some of the most powerful tools for quickly capturing data or accessing functionality from a third-party source, without having to hardcode or manually collect that information. An API (Application Programming Interface) is essentially a way for your server (local or browser) to interact with some other server to pull information.
In this case, we’ll be focusing on using the OCHRE API, which allows your code to access information stored in OCHRE projects. In practice, you will interface with the API through a link that accesses OCHRE database information using a relevant Citation URL— a permanent URL assigned by OCHRE to data that is published from OCHRE. A Citation URL is based on the UUID (Universally Unique Identifier) of your dataset or database item. A UUID is simply a unique number given to information of some kind. In this case, the UUID will identify the OCHRE data you wish to publish—a data table incorporating objects and their metadata, for instance—to the API, which will then use that UUID to access the information you want to publish. Keep in mind that the API call will only work if you have already published that information for the web in OCHRE. Instructions for this process can be found on the OCHRE Wiki article on Digital Publication.
Locating the Citation URL
Once you’ve created an item, or set of items, that you’d like to publish on your site in OCHRE, finding the API link is quite simple. Here, for instance, I have navigated to a sample Set in an OCHRE project. At the bottom of the screen, you will see a pane labeled Citation URL. This URL is the full API link for this Set.
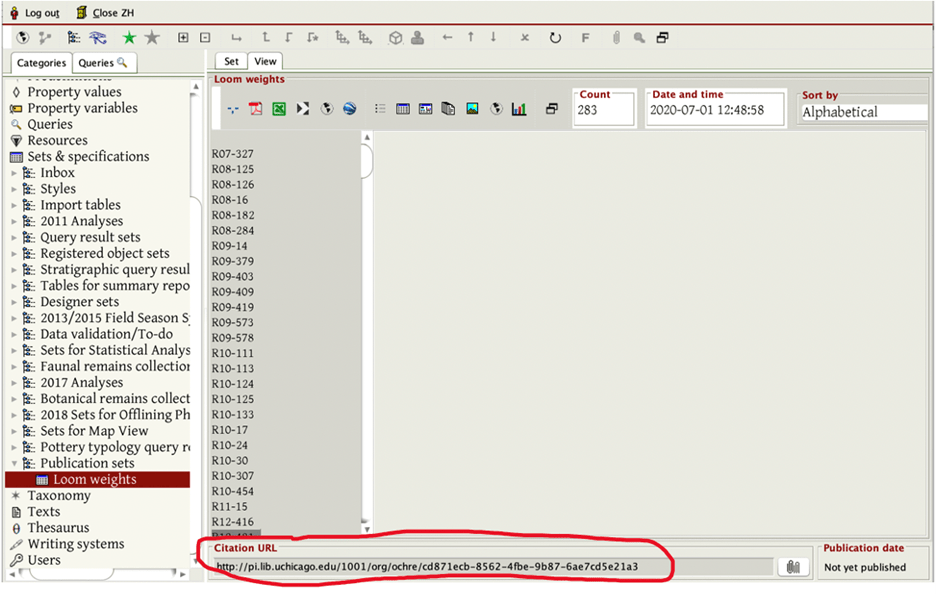
Copy the Citation URL of any OCHRE item, available when Viewing the item
The link has two main parts: http://pi.lib.uchicago.edu/1001/org/ochre/ is the base API link, which directs a server to the OCHRE API. The letters and numbers after the base link are the UUID for this particular Set. (You can also access this URL by right-clicking, or two-finger clicking on a Mac, on an item in the sidebar and choosing Copy Citation URL from the pop-up menu).
Using the API call in HTML
In the HTML code, the API link is treated like any other link. My sample homepage code has two sections that take API links: Tables and Photographs.

Code block for creating links using the OCHRE API
For this tutorial, I’ll be working with a published table from a different project, but the process is the same for photographs, and for most other OCHRE data.
Once you’ve found the API link, simply copy and paste it into the href setting of one of the <a> items, then replace that item’s inner text with the OCHRE item’s name or title.
<h2>Tables</h2><p><a href=”http://pi.lib.uchicago.edu/1001/org/ochre/accd571b-bae3-4d42-93d9-58b65ec79300“target=”_blank”>Ras Shamra Tablet Inventory</a></p>
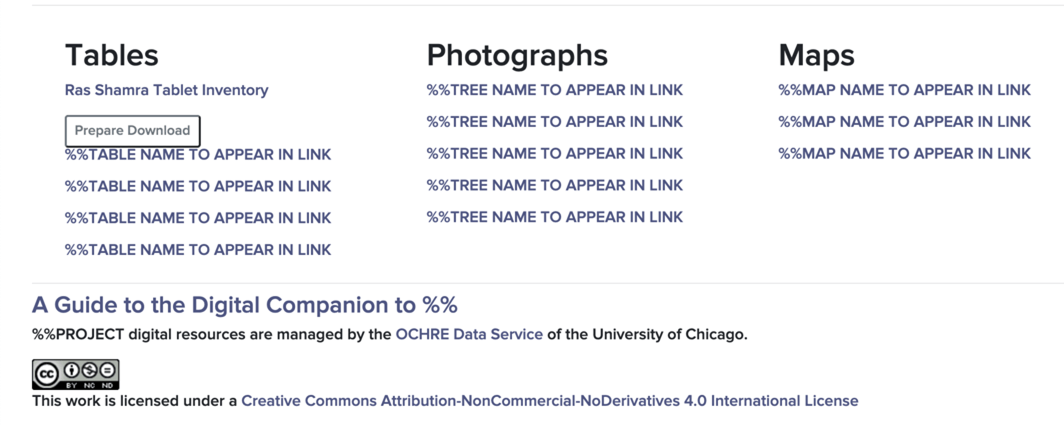
Add an API call to any link

OCHRE’s default styles format the data fetched by the API for display in the browser
4. Publishing your site
Commit Changes to GitHub
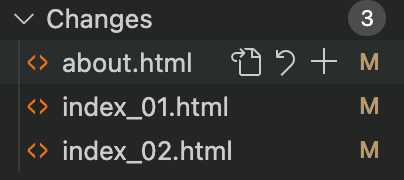
Although the OCHRE Data Service will update the publicly accessible version of your website, there are still a few steps that need to be taken on your end so that the OCHRE team can accept your changes. As soon as you make changes in your cloned repository, the Source Control tab on the sidebar will show that there are pending changes to be pushed back to GitHub.
In my workspace, for instance, I’ve changed three documents, as indicated by the Source Control icon in the sidebar.

Clicking on this icon brings up this window, which shows all the files that have been modified. Hovering over any of these changed files brings up a set of three options.
Hover over your changed files to take action
The first icon (sheet of paper) will open the file, the second (arrow) will discard all changes you’ve made to the file, and the third (plus sign) will stage your changes—that is, get them ready to be committed, or sent to the central repository. If you made changes in error, or would otherwise like to revert a file back to the form in which you most recently cloned it from the repository, use the second icon. If, however, you are satisfied with your changes, and would like them to take effect on your website, click the plus sign.
When one or more files are staged, the sidebar will update to reflect the Staged Changes.
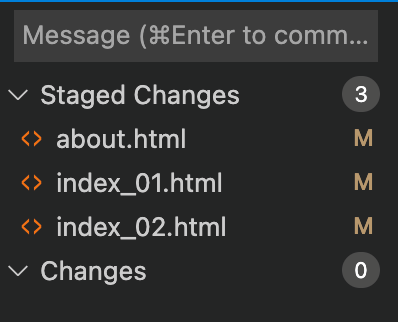
Staged Changes will be indicated on the sidebar
Note that hovering over the files in the Staged Changes section brings up a new set of options, one of which will allow you to Unstage the changes.
If you’re satisfied with all changes you’ve made, click into the text box above the Staged Changes. In this text box, you will be asked to enter a commit message, which is required by GitHub when pushing changes to a repository. The purpose of this message is simply to indicate what changed in this new version, so that anyone looking at the GitHub repository later on will be able to tell the differences between different versions of the files. For our purposes, this message can be as simple as you want; just take into consideration what information any collaborators might need as they work on the same files.
Once you have typed in a message, hit command + return on a Mac or control + enter on a PC to commit your changes. This will update your local repository to reflect the changes you’ve made. As soon as you commit your changes, the Source Control pane should clear, indicating that the commit has been successful.
Push Changes to the Shared Repository
Once you have committed your changes with an accompanying message, staged those commits so that git is aware of them (you may configure staging to happen automatically with each commit), you then need to push them to the shared repository. From the Source Control panel follow the dot-dot-dot menu (Views and More Actions…) and select the Pull, Push > Sync option.
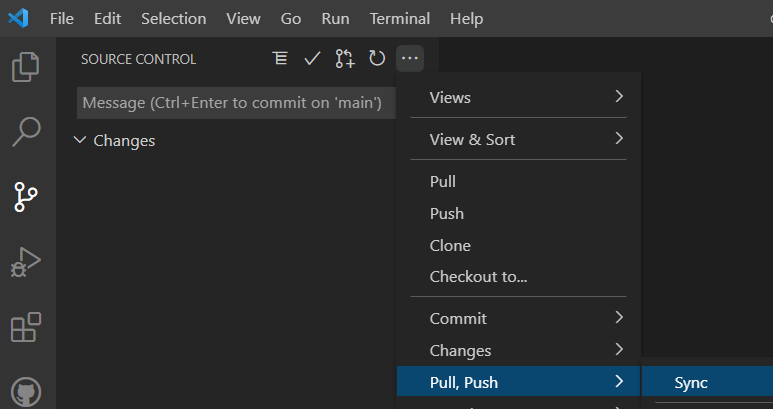
Push changes to the shared repository
Your end of the process is now complete.
Notify the OCHRE Data Service that you have updated your repository. Dr. Prosser at the OCHRE Data Service will push those changes to the web server, and your website should update to the new version within a few minutes.