
Limb amputations for tumor are occasionally performed when an extremity sarcoma involves both bone and soft tissue, and a local resection is not possible. These may consist of disarticulations (eg, at shoulder or hip joint) or amputations (eg, through femur or humerus bone).
ALWAYS review your grossing plan with an attending, and photograph liberally! It is best to consult with them the morning of the procedure to ensure timely triage. A PA can assist you, so include them early in this process, especially for coordinating their availability to cut the specimen with you.
Triage
- Take gross photos of the intact leg, being sure to include resection margin, any surface lesions, and/or any prior amputation sites.
- Measure leg in 3D, including:
- Length of leg from resection margin to heel
- Length of foot from heel to first digit
- Length of exposed femur
- Upper leg circumference
- Lower leg/calf circumference
- Describe the skin, noting any lesions, biopsy sites, or indurations.
- Describe any previous amputation.
- Submit the nerve and vascular margins from the fresh specimen, en face.
- Scoop out the proximal marrow and submit marrow margin from the fresh specimen. (Does not apply to disarticulations)
- Ink the remaining soft tissue margin black.
- If clinical or radiographic concern exists for joint involvement by sarcoma, you can disarticulate the limb at the relevant joint (eg, cut through the skin, soft tissue, and synovium in order to enter the knee joint or elbow joint, and separate upper from lower limb).
- Inspect the joint surfaces (articular cartilage, synovium, etc) for tumor seeding.
- Subsequently, you can gross the upper and lower limbs separately, depending on the location of the tumor.
Review the medical record and imaging to determine in which plane to cut the specimen for optimal demonstration of tumor and adjacent structures. The plane will be either sagittal, coronal, or transverse. Sectioning with the band saw must be done while the specimen is fresh in order to expose tumor for proper fixation.
- DO NOT EVER use the diamond saw alone. Make sure that a trained individual is present (PA, attending).
- Take the following items to the diamond saw:
- Fresh specimen inside a labeled container or bag.
- Place the above inside a red biohazard bag for transport.
- On a table or flat surface near the band saw, prepare an area for slices to be placed, in order, when cut. Eg, lay out blue chucks or cloths.
- Put on proper PPE (coat, gloves, face mask).
- A PA will be there to train/assist with use of the saw.
- Cut the specimen sequentially in the predetermined plane:
- If including joint, the first section near joint may need to be cut thicker than the remaining sections.
- Cut a donut of cortical bone margin to submit en face.
- Then take sequential sections in 0.5-1.0 cm increments.
- Regarding the proximal-most section: You may want to leave it thicker and then take sections perpendicular to the margin (see below).
- Lay out all the slices in order on the blue chucks/clothes to keep orientation (see below).
- Turn off and clean up the saw and general area. Leave it like you found it. There should be no tissue or blood on any surface. All separate blades should be properly discarded.
- When back in the gross room, photograph the cut surface of all relevant sections.
- Place in a labeled large formalin bin with plenty of formalin. Be sure to keep the original Beaker label with the specimen.

Proximal Margin, Perpendicular
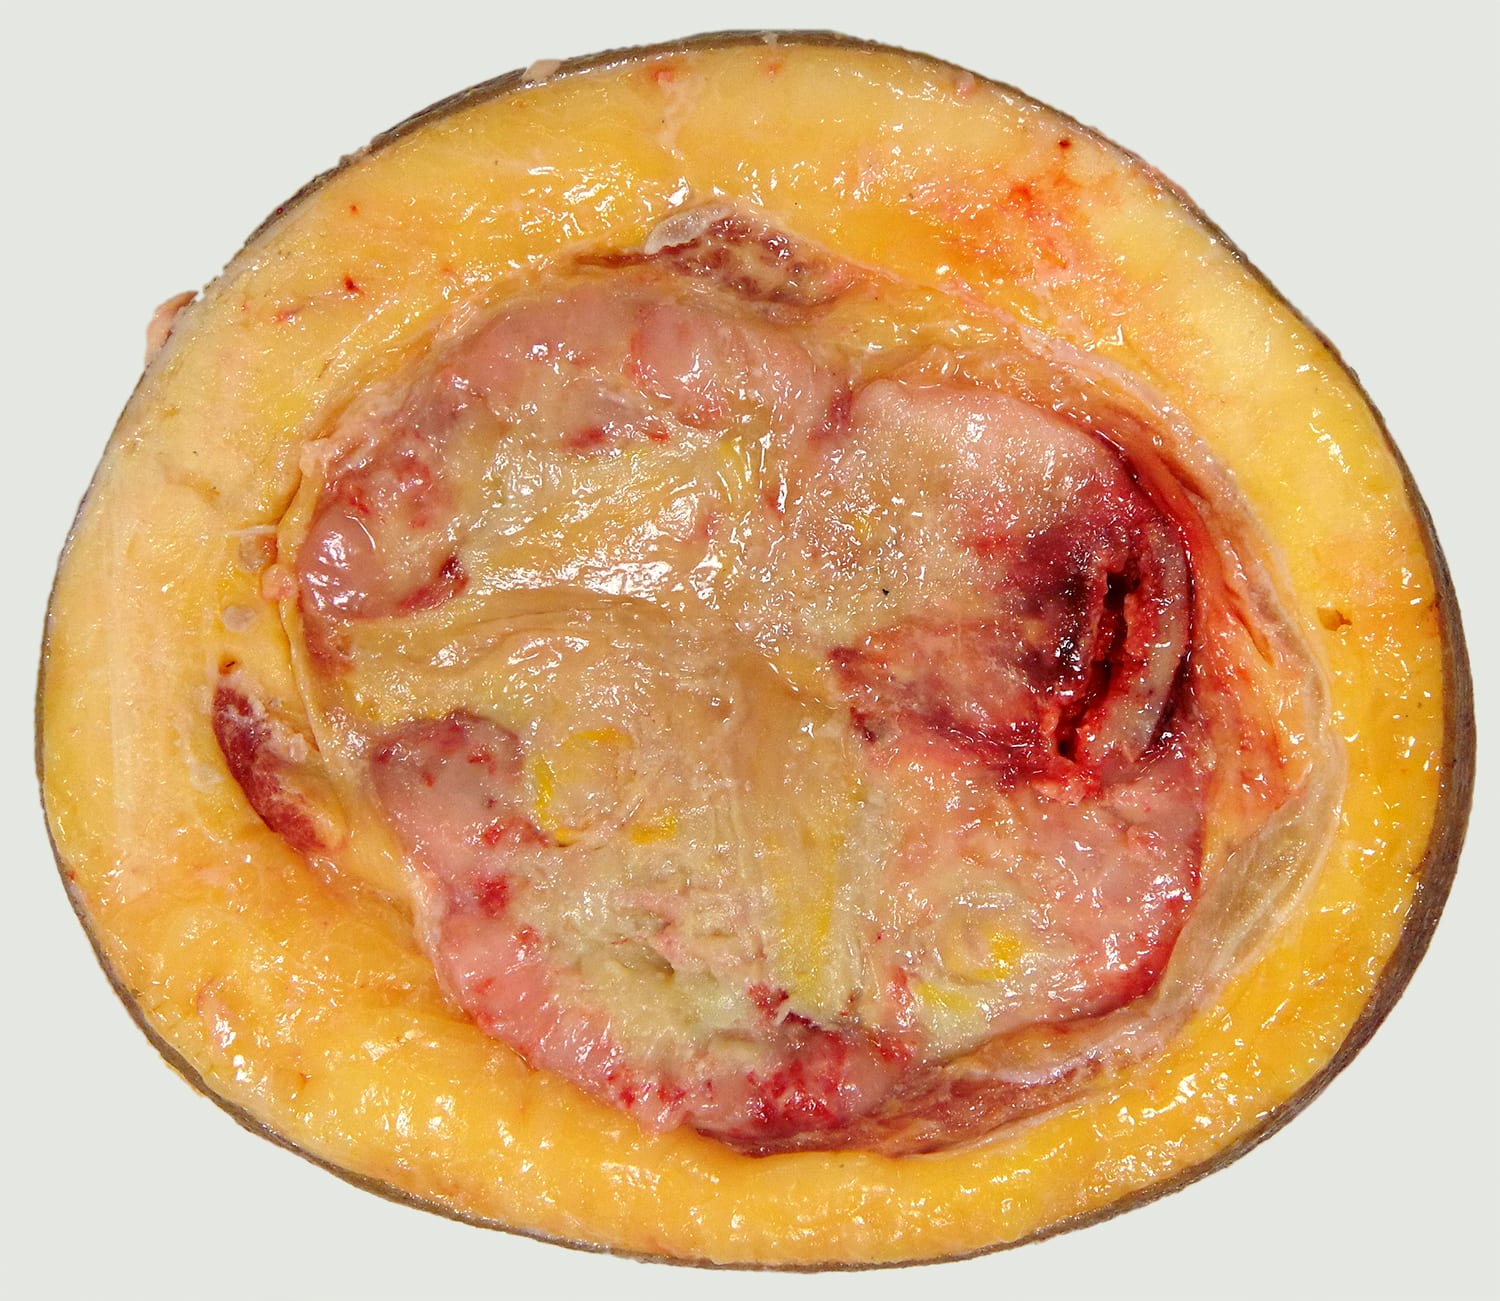
Cross Section, Representative
- While the specimen is still fresh, measure and document:
- Size of the mass
- % gross necrosis
- Involvement of adjacent vessel(s) and nerve
- Involvement of bone(s), including cortex, marrow, and location (diaphysis/metaphysis/epiphysis)
- Involvement of joint space
- Distance to skin, proximal soft tissue margin, and marrow margin(s)
- Determine with your attending the extent of tissue to be sampled / decalcified.
- Always submit NON-decalcified tumor (and/or EDTA-decalcified tumor) to preserve nucleic acids for molecular testing.
- Overall sections include:
- Nerve and vascular margins previously taken, en face
- Marrow margin previously taken
- Cortical bone donut, en face
- Skin and adjacent soft tissue margins, preferentially perpendicular
- Representative mass (discuss with attending the extent of submission)
- Representative mass with adjacent structures
- Artery
- Nerve
- Bone
- Skeletal muscle
- Adipose tissue
- Representative pathologic fracture, if applicable
- Representative skip lesions in other bone(s), soft tissue(s), if applicable
- Any other incidental findings
- Be sure to state “after EDTA decalcification” or “after HCl decalcification” in your cassette summary and add a Decal stain (appears as “Decalcification process” NOT “H&E Decalcification”) in Beaker. One “stain” per container will suffice, as the only result of ordering the “stain” is to drop a billing charge.
Updated 7/7/23 SRR, 10/15/25 SRR/NAC
